Abstract:
Abstract,
In this article I will discuss and share information on how we sow seeds and prepare plants for each season’s plantation. My aim is to answer as many questions of our clients as possible in this article. Additionally, the article is split into sections to help navigate for all levels of grower experience.
Seed sowing, transplanting seedlings and caring for plants on their first stages of growth:
- Obtaining Seeds:
We spent a long time preparing our shop to produce a pleasant and hustle-free experience for our clients. In order to place your first order, please feel free to read our article on “placing your first order” here.
Once you have obtained your seeds, it’s time to prepare the cups and propagation trays with your favorite potting soil, gather your tools and do some planting.
2. Materials required for sowing your seeds:
2.1 Propagation trays:
There are many, many, different varieties of propagation trays available in the market. To sow tobacco seeds you do NOT need specialized propagation trays, however in our experience the best propagation trays are usually the ones that are deep enough for the roods to develop and form nicely, and, the ones that are thin enough to allow you to push the plant out of the tray when ready to transplant in its final home (large pot or field), without damaging the delicate root system of the seedling(s).
The trays that we use are variable. For some species of tobacco like Rustica, Mohawk and some Oriental Tobaccos we use 50*50*75-100mm deep trays. For other plants we use PU cups of approximately 55mm in diameter and 100mm in depth (see photos below). Why the cups you ask? A few reasons:
- It’s easier to remove the seedling for its final transplant stage in the field – all is needed is to turn the cup upside down with the seedling between your fingers, squeeze lightly on both sides of the cup and voila, seedling removed and ready to be transplanted without damaging any roots. Also – the cups allow more soil and produce deeper roots and allow us to choose the plants that we want to transplant much easier than waiting for the potting soil to dry considerably in order to remove them from the trays;
- They are cheap;
- They are everywhere;
- Can be recycled for use countless times (so can propagation trays – but trays are not as easy to clean as cups);
So – most of the seedlings that we produce we use plastic cups as seen in the photos below:
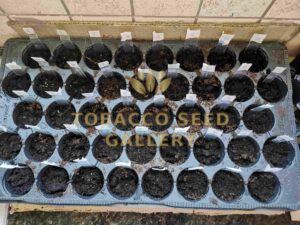
Image 1 – propagation trays;
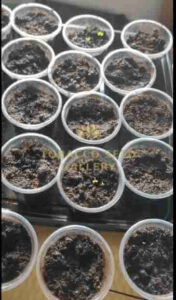
Image 2 – plastic cups;
2.2 Potting Soil,
One of the most important materials you will need to sow your seeds is the proper potting soil.
While most potting soils will work “well” for producing seedlings, the correct potting soil will make a world of difference. As a rule of the thumb the following apply when choosing your potting soil:
- PH = 5.5-6.2;
- Low chloride content;
- High nutrient content;
- Low impurities (like sticks and other byproducts);
- Low sand content – sand is good it makes the soil lighter;
- Lightness of soil;
- Low to no perlite in the mix (there’s a reason for this keep reading);
- Medium grain (this is very important);
So let’s talk about the above for a bit:
Perlite. The reason I personally avoid perlite in the mix I buy each season is because most of the times potting soil mixtures in the shops are placed in poor conditions and as a result they are subject to the elements. If the mix contains perlite then it’s highly likely that the mixture has obtained additional moisture. Additional moisture, especially when planting right after the first frost, means high probability for fungal growth. Even though not all fungi are bad, it’s better to avoid their presence and growth especially when the plants are at their most volatile stage.
Medium grain potting soils are also very important. In combination with sand content – This ensures that the soil drains freely which is also one of the most important aspects of correct tobacco growth. Additionally and also importantly, if you are sowing seeds in plastic cups, make sure that there is either a great number of holes at the bottom of the cups, or a lower number of large holes to allow the water to drain freely.
If you decide to go the cup way, go easy with creating holes so as to avoid losing soil and to avoid root development outside the cup (this is highly probable if you are using hydroponic systems or trays to place the cups in in order to water from down up).
Free draining and light soils are two of the most important aspects of correct tobacco growth, they ensure proper root spread and free water flow in the soil (which in turn avoids fungus growth).
Tobacco grows better in soils whose PH is within the range of 5.5 – 6.2. If you are trying to control the PH of your soil, keep in mind that things change over time and that temperature is a very key factor in PH control.
Also, tobacco is a “heavy feeder” and a species of plant that has a relatively high metabolism rate, this means that once the root system has developed, it will start consuming nutrients from the soil very fast. These nutrients will have to be replenished in the soil to ensure correct growth. This is much easier to control when growing tobacco in pots, where the used potting soil can just be put aside for a couple of years to replenish its nutrients – it’s a different story in the field though!
Once the potting soil has been chosen, it’s time to fill the cups or propagation trays. The next step is watering the potting soil (do this before sowing the seeds). Once the soil has been watered and the excess water allowed draining, placing the seeds in the palm of your hand and pinching them with your index finger and thumb fingers of your other hand (much like pinching loose salt to spread it over your food). Now spread the seeds in the middle of the pot of your choice. It’s important that most of the seeds are in the middle I will explain why later in this article.
2.3 Perlite
Perlite is important for controlling drier soils, especially for locations with lower humidity and warmer weather. Use perlite lightly as it changes the PH of the soil mix, so, the amount of perlite you use especially in the seedling stage is important. Little perlite can hold humidity in the mix and allow it to dry slower, as you can imagine, this is also one of those ingredients that can increase the probability of fungal growth, thus, use perlite lightly.
3.0 Placing the seedlings in sunlight
Sunlight is good. Sunlight is important for all plants and seeds. However if you are planting in the summer months make sure that you sow the seeds indoors. If you are planting in spring, make sure that once the seeds are sown you place the trays or cups at a location where there is indirect, second hand, sunlight. This is important as it introduces enough sunlight without risking burning the seedlings or damaging the seeds.
Introducing your seedlings to stronger sunlight slowly is also important, this will very quickly increase the thickness and strength of the leaves and the probability of the plant going into transplant shock when transplanted at its final location is greatly reduced.
4.0 Grow lights (full spectrum lights)
An interesting conversation that can be had here is grow lights. We use them all the time especially in the first sow of the year that we do in the winter. A few important things to keep in mind when using grow lights (or full spectrum lights):
- They are NOT optimized for plants;
- The higher up they are the weaker the light that the plant will receive;
- The further away the plant is from the center of the light it will tend to bend towards it – for this reason when using grow lights it’s important to use a grid and place plants accordingly;
- The seeds will sprout slower in grow lights than in the sun;
- The higher the wattage – the higher the growth (this is just not true). The location with respect to the plant, the height with respect to the plant and the power of the grow light (and its spectrum) as a single unit and as a grid are important;
5.0 Caring for seedlings;
5.1 Watering (how much and when);
Once the seeds have been sown and the pots/cups are placed near light, the next step is making sure that enough, but not excessive water is used.
Excessive water will produce fungus and also drown the seeds. Not enough water will dry the soil and also kill the seeds.
As a rule of thumb – do not let the surface of the pot or tray dry, make sure that there is enough light and adequate ventilation (air movement is one of the biggest enemies for fungus).
It’s important to be careful when watering your seeds in order to avoid moving around the seeds too much.
5.2 Germinating seeds;
The most exciting part of the process is about to start.
Depending on the temperature conditions, seedlings will take anywhere from 5 days to a few months to start sprouting. This is correct with most species. Species like Rustica and Mohawk – will germinate much faster – in some cases as fast as 2 days.
In the winter it is important that the location you choose to sow seeds is warm, if not the growth will be slower. For this reason a lot of our clients (including ourselves) use heat-beds and thermostats to stabilize the temperature at the base of the plants or pots.
The best temperature to germinate seeds is approximately 18 degrees Celsius (65 Fahrenheit). Even though seeds will germinate in lower temperatures it will take more time to start seeing seedlings, much more time.
A note of caution here – careful when using heat beds. They produce heat on the underside of the trays/pots which in turn dries out the soil much faster, be extra careful in placing the temperature probe as low as possible in the pot in order to avoid damaging roots from overheating.
The following photos demonstrate some of the seedlings we produced last season:
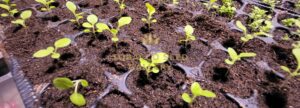
Image 3 – seedlings;
5.3 Trimming leaves on seedlings;
Once your seedlings are 3 weeks old they will start producing larger leaves. Note that leaves on this stage of growth are not true leaves. The first true leaves will come in at around weeks 6-8.
Once the first leaves are in, and approximately 25mm (1”) it’s time to start trimming them. This is important and there are many schools of thought on how and why we do this, but the truth is simple – this is done to strengthen the root while allowing the plant enough leaf to photosynthesize as seen in the photo below:
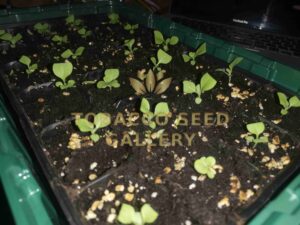
Figure 4 – trimmed leaves on seedlings;
On this stage you are well on your way to producing tobacco plants. Be careful though, because the plants are still very sensitive to many things.
5.4 Fertilizing;
Once in the 5 week mark and the seedlings are approximately 35-50mm tall (2”) it’s time to start thinking diluted fertilizers.
Even though we at tobaccoseedgallery.com love organic fertilizers, at this stage, it’s all about correct and fast growth. Organic fertilizers will produce the correct growth we are looking for but slower. This is why we use very diluted formulas of 20-20-20 fertilizer. The formula we use is ½ teaspoon dilutes in 1.5L of water. The fertilization frequency we use is at least once a week for our seedlings which equates to approximately every second or third watering cycle.
Out in the field is a different story – one that deserves its own article.
- Thinning the herd,
Once the seeds start germinating, it’s important to keep a close eye on the strength of the seedlings. As mentioned above it’s important to sow the seeds as close to the middle of the pot/cup as possible.
This is done because a few weeks after the seeds come in its time to thin out the herd and keep the strongest plant that is also in the middle. This is done either by gently pulling the plants you have chosen to remove (careful with this method as the roots may get intertwined and damage the roots of the strongest plant in the middle – the roots at this point are very sensitive). An additional method that can be used is just cut the plants you would like to remove as close to the soil as possible.
Once this process is completed you should end up with a tray or series of pots very similar to the photos below:
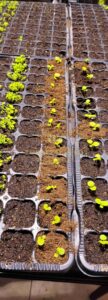
Figure 5 – thinning seedlings;
At this point its important to note that there are other methods of germinating and transplanting seedlings from single trays (transplant trays). In fact we do this for many species of tobacco that are destined for our field.
However there are a few very important notes that you need to know when doing this:
- When transplanting seedlings from a tray to a pot, inevitably the weaker roots get damaged – as such the transplanted seedling takes longer to show initial growth;
- When using this method, there’s a higher % that the seedling will not survive – thus this method is generally suggested for more experienced tobacco growers;
- This is the method that most tobacco plantations use;
- This method produces more plants, it also requires less space, which becomes important when producing tobacco plants for larger operations;
Recap and a few additional notes:
- Good potting soil is required (PH 5.5 – 6.2);
- Good propagation trays or cups, make sure they drain water freely and that you label the different species of tobacco you are planting, also – and this is important – if you are using shallow propagation trays (which you can do but we don’t recommended) do not fill with soil to the brim – when watering it is easy to have seed migration from one species to another (or one long line to another);
- Seed sprouting is directly proportional to temperature, soil quality and soil humidity;
- Seedlings are sensitive to fungus;
- Fertilizing in close cycles is important with very diluted fertilizer – do not fertilize seedlings before 5-7 weeks after they have germinated as this will most likely burn the seeds/seedlings – also keep in mind that most potting soil mixtures are preloaded with a small amount of fertilizer;
- Take care not to over water – this applies to seeds and seedlings;
- Light is very important – direct second had light more so. There’s a few things here that you need to be careful of. Most commonly – if the plants start to bend its highly likely one of the following scenarios:
- The soil is too hard and the root growth is pushing the plant upwards;
- The seedlings are not receiving enough sunlight and as a result they are bending to find sunlight;
- The seedlings are placed in window facing east-west and are lowering the leaves in order to get to the sun – as a result a bent column is introduced;
- A combination of the above;
Thanks for taking the time to read through this article. I really hope that it answered most of the questions you have.
If you are a first time grower – welcome to the amazing world of tobacco, I hope your journey with us is as fun as ours ha and continues to be, and as always – please feel free to contact us for any additional information or to share your photos and/or knowledge with us.
As we stated many times throughout our website, we are always delighted in hearing the experience of fellow as well as sharing more information. So please feel free to contact us directly for any questions, remarks and for any additional information.